

Gold Earring Restoration Guide: Soldering, Reshaping, and Post Fixes
Identifying Gold Composition Before Repair
Gold earring repair usually starts with one of three fixes: straightening a bent post with nylon-jaw pliers, soldering a snapped post with a micro-torch and paste flux, or tightening worn prongs to secure a loose gem. The right method depends on the metal structure of your piece, because gold behaves differently under heat and stress depending on its purity and whether it is solid or layered over a base metal.
Solid Gold vs. Gold-Filled and Plated Alloys
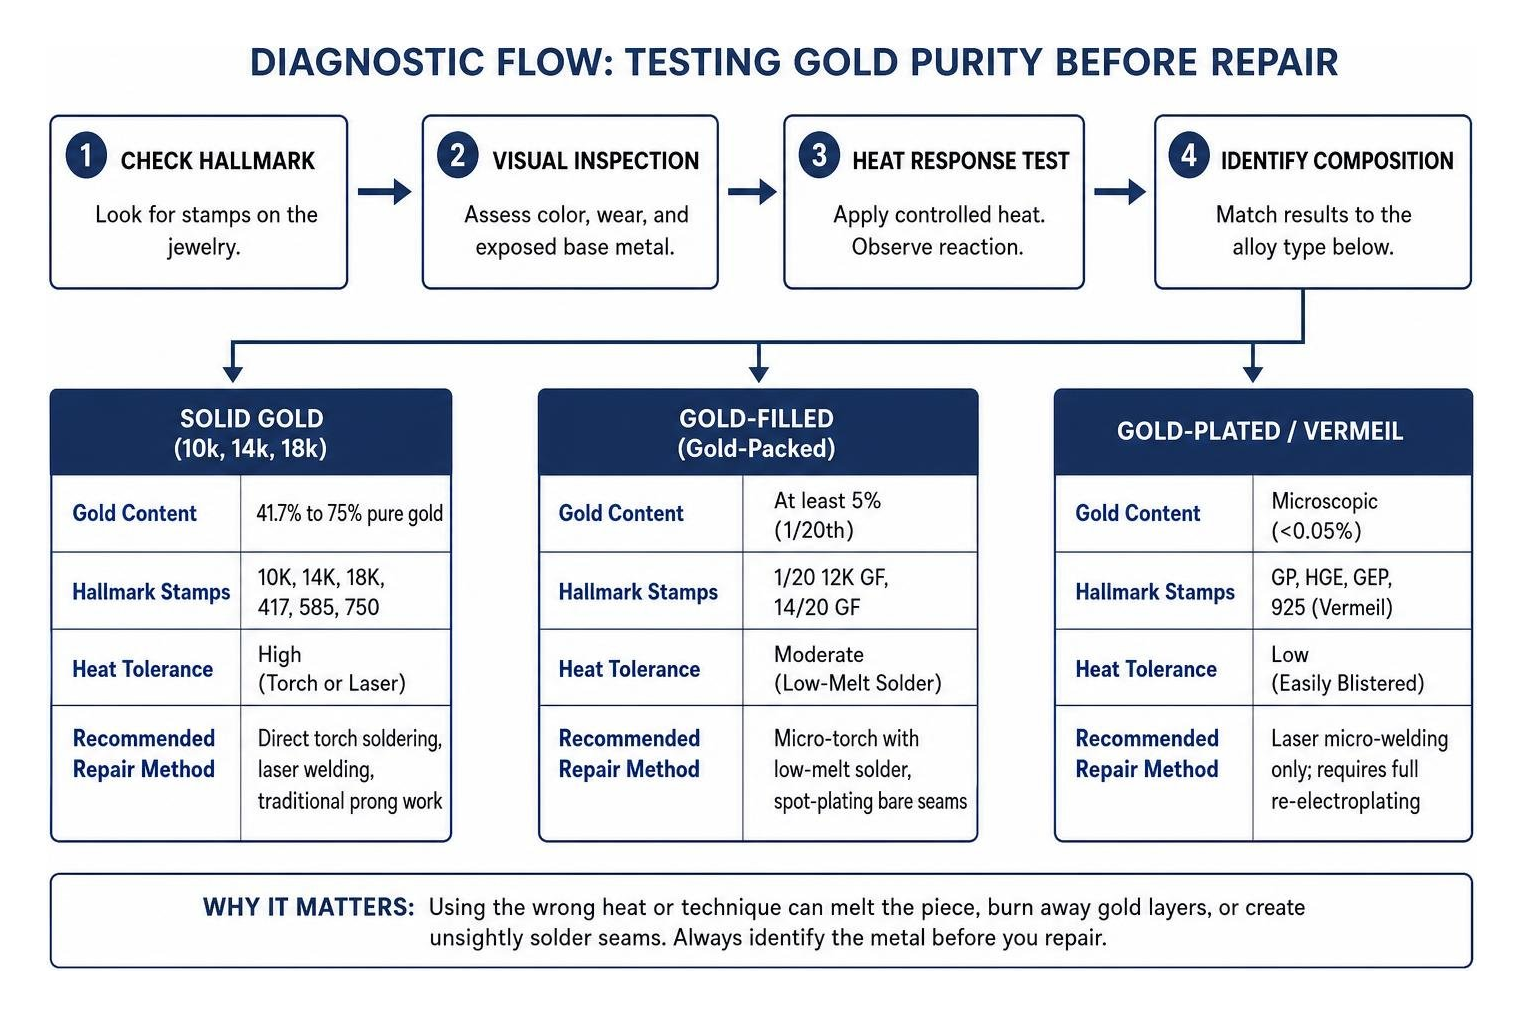
Solid gold, gold-filled, and gold-plated earrings require completely different bench procedures. Applying high heat to the wrong alloy can melt the piece, burn away microscopic gold layers, or create unsightly solder seams.
| Metal Type | Gold Content by Weight | Hallmark Stamps | Heat Tolerance | Recommended Repair Method |
|---|---|---|---|---|
| Solid Gold (10k, 14k, 18k) | 41.7% to 75% pure gold | 10K, 14K, 18K, 417, 585, 750 | High (Torch or Laser) | Direct torch soldering, laser welding, traditional prong work |
| Gold-Filled (Gold-Packed) | At least 5% (1/20th) | 1/20 12K GF, 14/20 GF | Moderate (Low-Melt Solder) | Micro-torch with low-melt solder, spot-plating bare seams |
| Gold-Plated / Vermeil | Microscopic (<0.05%) | GP, HGE, GEP, 925 (Vermeil) | Low (Easily Blistered) | Laser micro-welding only; requires full re-electroplating |
Gold-filled jewelry features a mechanically bonded outer layer of karat gold that is approximately 100 times thicker than electroplating. While durable, excessive heat causes the gold to sink into the core alloy. A detailed bench guide on repairing gold-packed jewelry emphasizes using paste flux and low-temperature easy solder to prevent base metal bleed-through.
Special Handling for High-Karat and Heirloom Gold
High-karat gold (22k and 24k) is exceptionally soft, rich in color, and possesses a higher melting point than standard 10k or 14k commercial alloys. However, working on imported or antique high-karat pieces presents unique challenges:
- Depletion Gilding: Many traditional 22k pieces from South Asia undergo chemical depletion gilding during fabrication to draw pure gold to the surface. Direct torch heat can burn through this enriched layer, exposing a lighter core and requiring corrective electroplating.
- Solder Matching: Using 14k solder on 24k gold creates an unsightly gray seam. Bench jewelers use custom 22k gold alloy solder to maintain seamless yellow tones.
- Oversized Earring Posts: Imported earrings often feature 16-gauge posts (approx. 1.29 mm), which can be painful for standard Western piercings. Jewelers can carefully carve down the posts to a standard 20-gauge (approx. 0.81 mm) without structural failure. A metalsmithing guide on repairing high-karat gold earrings outlines practical considerations for handling these delicate alloys.
Step-by-Step Methods for Gold Earring Repair
Fixing damaged gold earrings ranges from simple non-destructive alignment to high-precision torch and laser work.
Reshaping Bent Posts and Hoops
A bent post or distorted hoop latch does not always require heat. Because gold work-hardens and becomes brittle when bent repeatedly, cold-straightening must be done with great care.
- Inspect for Micro-Fractures: Use a 10× jeweler's loupe to check the base of the post for hairline cracks. If visible cracks exist, straightening it cold will cause it to snap.
- Use Non-Marring Tools: Grip the post using parallel-action, nylon-jaw pliers to prevent gouging the soft gold surface.
- Apply Incremental Pressure: Work from the base of the bend toward the tip, applying gentle, pulsating pressure rather than forcing the metal in a single stroke.
- Realign Hoop Latches: For wire-and-clutch hoops, use smooth flat-nose pliers to adjust the tension notch upward or downward by fractions of a millimeter until it clicks firmly into the catch.
Soldering and Bench Techniques for Gold Earring Repair
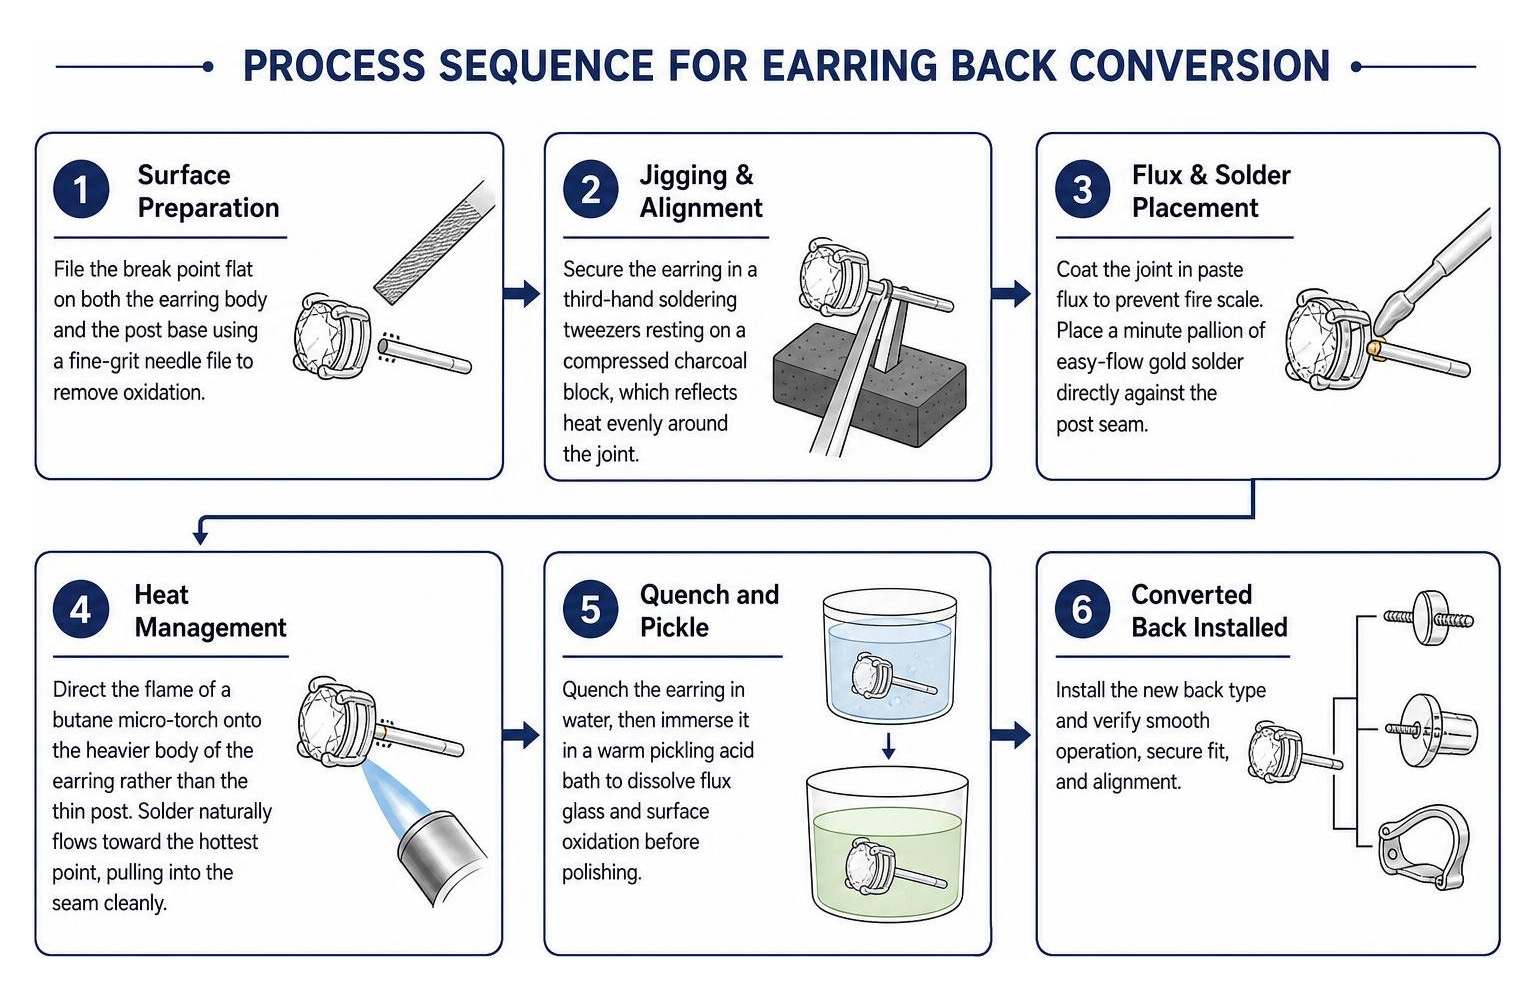
When a post snaps off cleanly at the base, it must be reattached using metallurgical bonding. Mastering how to repair an earring post involves managing localized heat transfer to avoid softening the entire earring body.

- Surface Preparation: File the break point flat on both the earring body and the post base using a fine-grit needle file to remove oxidation.
- Jigging & Alignment: Secure the earring in a third-hand soldering tweezers resting on a compressed charcoal block, which reflects heat evenly around the joint.
- Flux & Solder Placement: Coat the joint in paste flux to prevent fire scale. Place a minute pallion of easy-flow gold solder directly against the post seam.
- Heat Management: Direct the flame of a butane micro-torch onto the heavier body of the earring rather than the thin post. Solder naturally flows toward the hottest point, pulling into the seam cleanly.
- Quench and Pickle: Quench the earring in water, then immerse it in a warm pickling acid bath to dissolve flux glass and surface oxidation before polishing.
Restoring Worn Prongs and Securing Loose Gems
Diamond and gemstone earrings take heavy abrasion from daily wear, hair products, and clothing fibers. If you notice a stone wiggling, the setting needs immediate attention. Following professional bench procedures to repair a gold diamond post setting ensures the gems remain secure without suffering heat shock:
- Prong Tightening: Use a jeweler's prong pusher to seat loose prongs using the North-South-East-West cross-pattern. This distributes mechanical tension evenly across the stone's girdle.
- Heat Shielding: When torch-soldering or re-tipping prongs adjacent to diamonds, coat the stone in thermal heat-shielding paste to prevent burning, frosting, or clouding.
- Prong Re-tipping: For thinned prongs, a micro-laser welder adds tiny beads of matching karat gold directly to the tip, rebuilding structural security without applying ambient torch heat to fragile stones.
- The Floss Test: After tightening and polishing, run a strand of woven dental floss around the setting. If the floss catches on a prong tip, the prong requires smoothing with a cup bur to prevent snagging on clothing.
Backing Conversions, Stone Sourcing, and Replication
Converting Earring Backs for Security and Comfort
Standard friction butterfly backs can loosen over time, risking the loss of valuable earrings. Converting your earring backings enhances both comfort and peace of mind:
- Threaded Screw-Backs: Ideal for valuable diamond studs, replacing friction posts with threaded gold rods and matching screw nuts prevents accidental slippage.
- La Pousette (Protector) Backs: A spring-loaded clutch mechanism that locks into grooved posts, combining rapid push-button release with the high security of a screw system.
- Clip-On & Omega Backs: For non-pierced ears or heavy chandelier designs that pull on delicate earlobes, laser-welding an omega clip distributes weight across the lobe.
Replacing Lost Gemstones and Recreating Missing Pairs
Losing one half of an earring set or dropping an accent stone is a common frustration. Restoration specialists restore balance through dedicated matching techniques:
- Gemstone Matching: Jewelers match replacement diamonds and colored gemstones by millimeter size, carat weight, color grade, clarity, and cut proportions to ensure optical symmetry.
- 3D CAD Replication: If a single earring is lost, the surviving mate is scanned using high-resolution 3D digital scanners.
- Lost-Wax Casting: A resin model of the mate is printed, cast in matching karat gold, hand-set with matching stones, and polished to mirror the original piece.
Professional Services: Costs, Turnaround, and Safety
Understanding industry pricing, service timelines, and the limitations of home remedies helps you make informed restoration decisions.
Cost and Turnaround Estimates for Professional Gold Earring Repair
Professional gold earring repair is an affordable way to preserve fine jewelry. Repair and restoration services typically start at $39.99, while standard earring post repairs generally range from $20 to $50, depending on the karat purity, backing style, and whether laser micro-welding or traditional torch soldering is required.
Most standard repairs are completed within 3 to 5 business days after quote approval. Complex gemstone sourcing or custom CAD casting for lost mates may take 1 to 2 weeks.
The Hidden Hazards of DIY Superglue Fixes
When an earring post breaks, reaching for cyanoacrylate (superglue) is a tempting quick fix. However, adhesives create serious problems:
- Skin Irritation: Cyanoacrylate degrades quickly when exposed to body oils and moisture, releasing compounds that can cause localized allergic contact dermatitis inside the ear piercing.
- Brittle Bonding: Superglue has zero shear strength on non-porous metals. The post will snap under minor lateral pressure, often resulting in the permanent loss of the earring.
- Gemstone Frosting: Superglue vapors leave an insoluble white film (blooming) across the facets of diamonds and gemstones, dulling their brilliance.
- Bench Complications: Adhesives burn into a stubborn carbon residue under high heat, requiring jewelers to perform ultrasonic chemical stripping before standard soldering can occur.
Frequently Asked Questions About Gold Earring Repair
Can I solder a gold earring post back on at home?
Soldering at home is possible only if you have specialized bench tools (a butane micro-torch, paste flux, charcoal block, and pickling solution). Standard soldering irons used for electronics do not generate the 1,300°F+ temperatures required to flow gold solder. Furthermore, heat-sensitive stones (such as emeralds, opals, or pearls) will crack or burn if heated without proper thermal barriers or micro-laser welding equipment.
Why do gold earring posts keep bending?
Gold is a naturally ductile metal. Repeated mechanical stress—such as sleeping with stud earrings on, storing jewelry loose in a pouch, or using overly tight friction backs—causes the metal to flex. Over time, this repeated movement causes metal fatigue and work-hardening, making the post brittle until it snaps.
How do I match a missing earring if I lost one half of a pair?
A custom jeweler can duplicate your remaining earring using 3D CAD modeling and lost-wax casting. The surviving earring is measured, an identical digital wax model is rendered and cast in an identical gold alloy, and replacement gemstones are matched for cut, color, and clarity.
Conclusion
Whether straightening a bent post, replacing worn prongs, or converting friction posts to secure screw-backs, caring for your gold earrings preserves both their structural integrity and sentimental value. While minor adjustments can be made at home with nylon-jaw pliers, snapped posts and loose gems require the precision of professional soldering or micro-laser welding.
At Mervis Diamond Importers, our master jewelers inspect prongs, rebuild worn settings, and provide thorough ultrasonic cleanings to keep your jewelry secure for years to come. For more ways to maintain your fine jewelry collection, explore our complete guide to proper diamond and fine jewelry care to keep your favorite pieces looking radiant.