

Broken Earring Post Troubleshooting and Repair Handbook
How to Fix a Broken Earring Post Safely
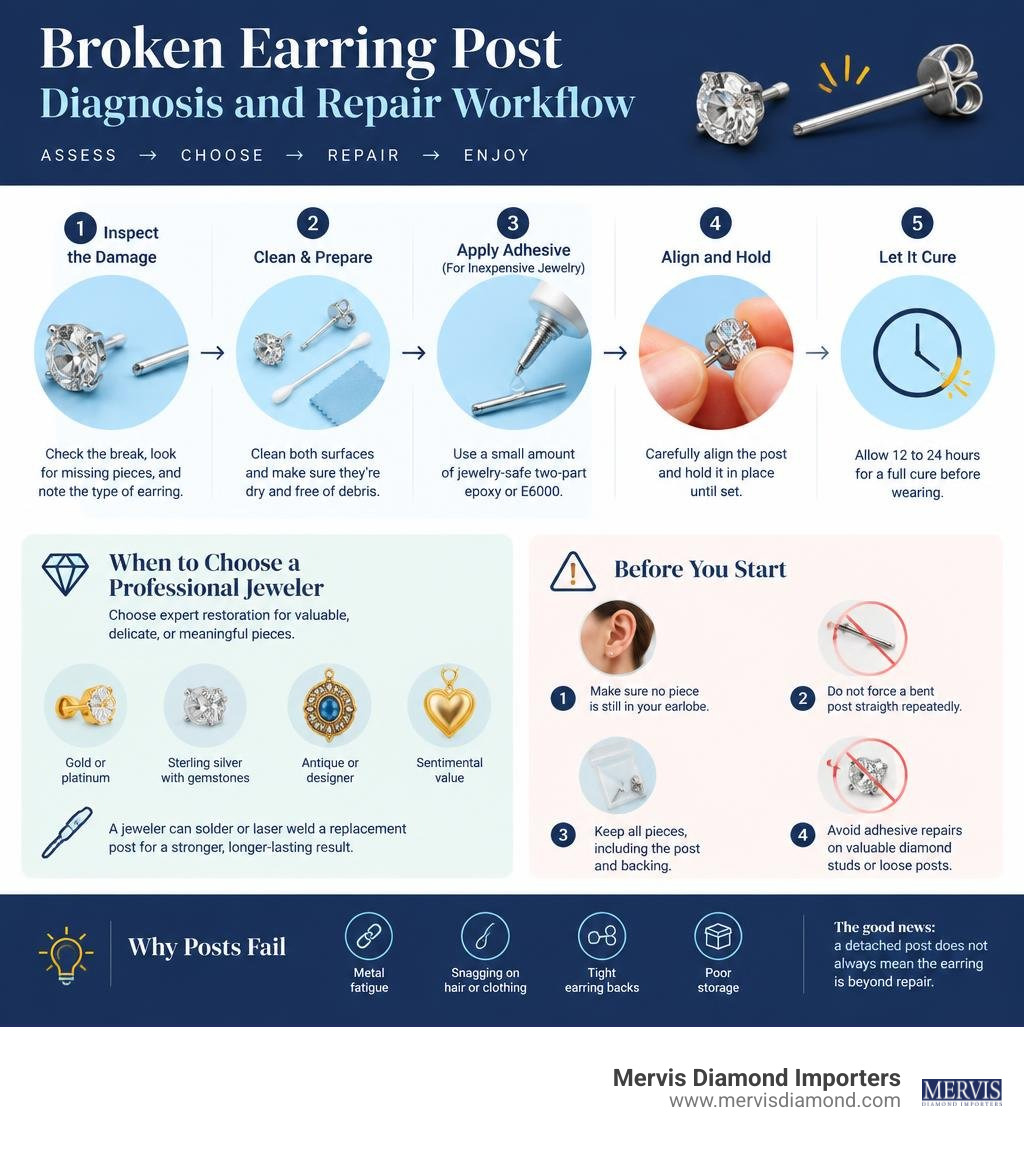
A broken earring post can sometimes be fixed at home, but the right repair depends on the earring's value, material, and damage. For a clean break on inexpensive costume jewelry, clean both surfaces, use a small amount of jewelry-safe two-part epoxy or E6000, align the post carefully, and let it cure for 12 to 24 hours. Do not use hot glue for a wearable repair.
Choose a professional jeweler instead if the earring is gold, platinum, sterling silver with gemstones, antique, designer, or sentimental. A jeweler can solder or laser weld a replacement post for a far stronger and more durable result.
Before doing anything:
- Remove the earring and check whether any piece is still in your earlobe.
- Do not force a bent post straight repeatedly; sterling silver and other metals can become brittle through repeated bending.
- Save every broken piece, including the post and backing, in a small bag.
- Avoid adhesive repairs on valuable diamond studs or pieces where a loose post could mean losing the earring.
Posts often fail from metal fatigue, snagging on hair or clothing, tight earring backs, and poor storage. The good news: a detached post does not always mean the earring is beyond repair.
I am Morris Mervis, and this handbook will help you decide when a careful home fix makes sense and when expert restoration is the safer choice.
Diagnosing a Broken Earring Post: Causes and Damage Assessment
Earring posts endure a surprising amount of daily mechanical stress. Every time you push an earring into place, clamp down a clutch, or pull it off at the end of the day, you apply lateral leverage to a thin metal wire measuring roughly 0.8mm (20 gauge) in diameter. Over time, these micro-movements weaken the structural integrity of the metal at its connection point.
Understanding your earring's metal composition helps determine how it responds to stress and whether it can be reshaped or requires permanent fusion.
| Metal Type | Durability Level | Repair Difficulty | Common Failure Points | Best Repair Approach |
|---|---|---|---|---|
| 14k / 18k Gold | High | Moderate | Solder joint fatigue, bent posts | Torch soldering or laser welding |
| Platinum | Very High | Advanced | Rare structural snapping | Laser welding |
| 925 Sterling Silver | Moderate | Moderate | Work hardening, brittle snapping | Cold adhesive (DIY) or torch soldering |
| Surgical Steel | High | Advanced | Stripped threads, sheared stems | Laser welding or finding replacement |
| Titanium | Extremely High | Expert Only | High melting point resistance | Specialist laser micro-welding |
| Base Metal / Costume | Low to Moderate | Low (Cold Fix) | Solder point detachment, pot metal fracture | Two-part epoxy or E6000 |
Common Causes of a Broken Earring Post
Post breakage rarely happens out of nowhere. Instead, it is typically the result of gradual mechanical wear or acute accidental force.
- Metal Fatigue and Work Hardening: Repeatedly nudging a bent post back into place hardens the metal crystalline lattice. In sterling silver and lower-karat gold alloys, this causes the post to become brittle until it snaps under minimal pressure.
- Snagging on Fabric and Hair: Knitted sweaters, scarves, bath towels, and loose hair strands can catch the setting. A sudden pull creates immense leverage against the base of the post.
- Improper Storage Practices: Tossing loose earrings into a crowded tray allows heavier pieces to press against delicate stems, bending them over time.
- Sleeping in Studs: Pillow friction pushes the earring sideways against the earlobe all night, placing continuous torque on the post.
- Overly Tight Earring Clutches: When earring backs fit too tightly, forcing them on and pulling them off repeatedly stresses the stem base. Readers interested in stem mechanics can explore earring stem failure mechanics for a deeper look at metal dynamics across different earring styles.
When you invest in handcrafted classic diamond stud earrings, protecting those fine mountings from unnecessary mechanical strain preserves both the stones and their precious metal settings.
Evaluating DIY Viability vs Professional Bench Repair
Before reaching for an adhesive or a set of pliers, evaluate the construction and value of your earring.
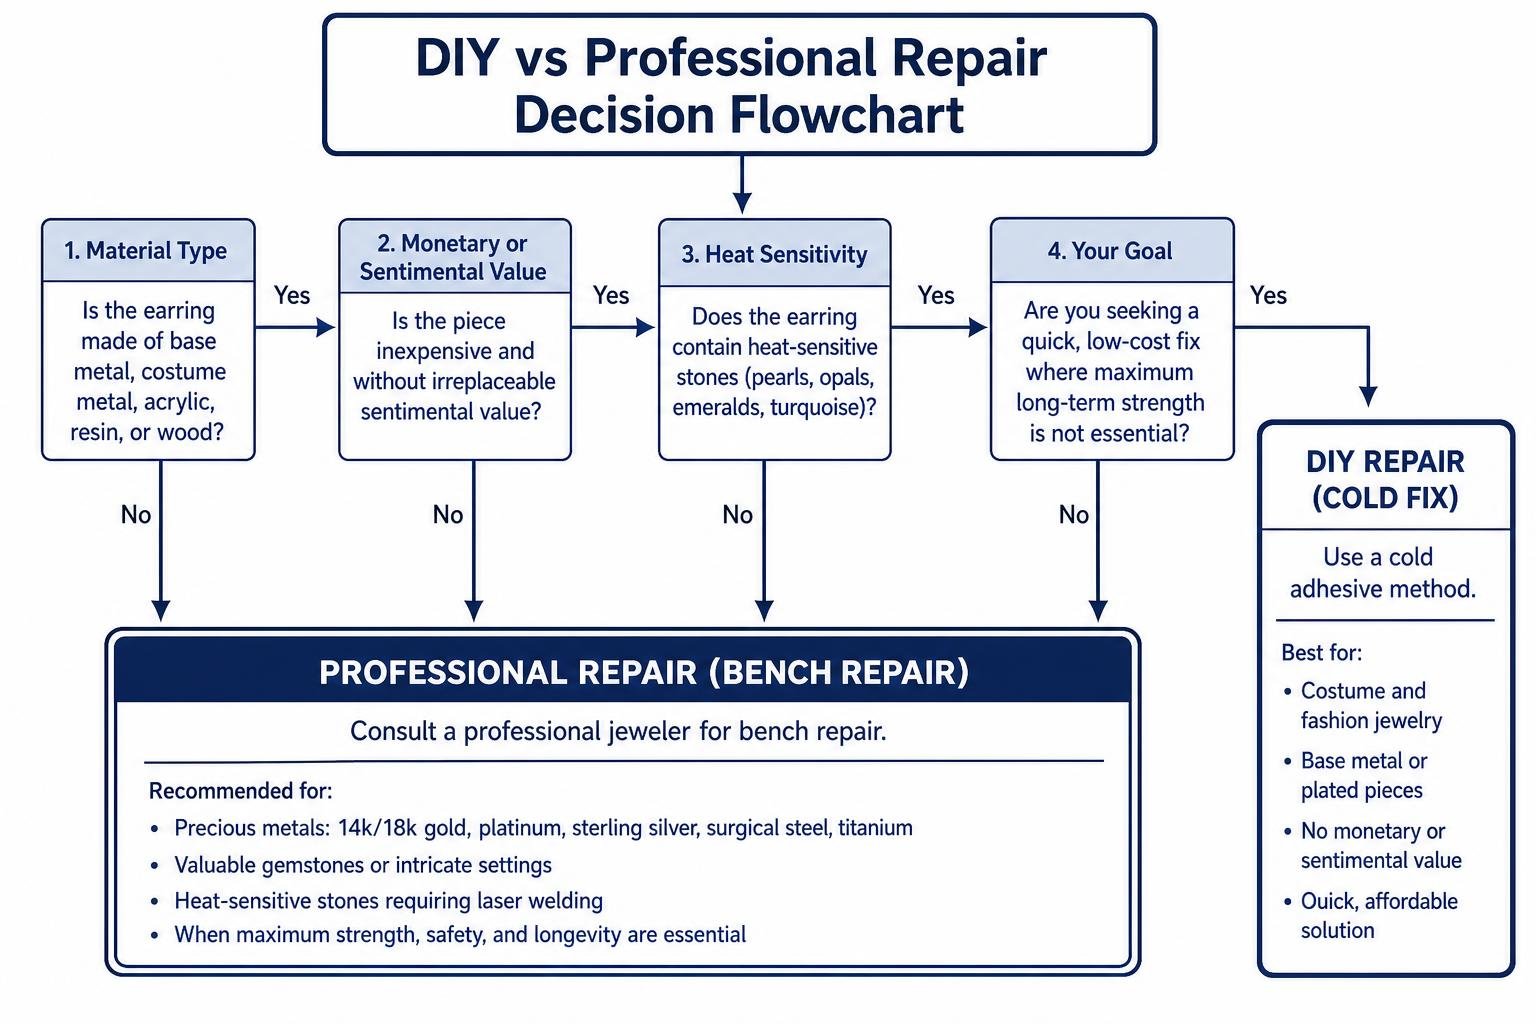
- Costume and Fashion Jewelry: If the piece is made of plated base metal, acrylic, resin, or wood with no monetary or irreplaceable sentimental value, a home cold-connection adhesive repair is an affordable, practical choice.
- Fine Gemstones and Precious Metals: Solid 14k gold, 18k gold, and platinum earrings demand professional bench repair. Using glue on fine jewelry introduces chemical residues that foul the setting and fails to provide the tensile strength required to secure valuable gems.
- Heat-Sensitive Stones: Pearls, opals, emeralds, and turquoise cannot withstand torch heat. A master jeweler will use pinpoint laser welding to reattach the post without transferring thermal energy to the gem.
Choosing secure backings also plays a major role in preventing post damage; review our guide on the best backing options for diamond earrings to ensure your clasps fit comfortably without placing excess drag on the post.
Step-by-Step DIY Methods for Earring Post Repair
For fashion earrings and costume pieces, a cold-connection adhesive repair can restore your jewelry without heat.
Repairing a Broken Earring Post with Jewelry Adhesives
Standard household adhesives behave differently under physical tension. Cyanoacrylate (standard super glue) sets rapidly, but it cures into a hard, brittle resin that lacks shear strength. It can shatter when subjected to the twisting force of putting on an earring back. In contrast, industrial-grade jewelry adhesives provide a balance of tensile strength and microscopic flexibility.
Recommended Adhesives:
- Two-Part Jeweler's Epoxy: Offers the highest bond strength for metal-to-metal contact.
- E6000 / Aleene's Ultimate Glue: High-strength, semi-flexible industrial adhesives that absorb daily movement well.
Materials Needed:
- Two-part epoxy or E6000 adhesive
- Wooden toothpicks
- Fine-grit sandpaper (400-grit) or an emery board
- Isopropyl alcohol (91% or higher) and lint-free cotton swabs
- Craft foam, poster putty, or a raw potato (to hold the post upright during curing)
Step-by-Step Adhesive Application:
- Surface Preparation: Scrape away any dried factory glue from the earring back and the post pad using a craft knife. Lightly scuff both mating surfaces with 400-grit sandpaper. This process—known as creating a mechanical key—gives the adhesive microscopic grooves to grip.
- Degreasing: Dip a cotton swab in isopropyl alcohol and wipe both surfaces thoroughly to eliminate skin oils, metal dust, and polishing residue. Allow them to air-dry completely.
- Adhesive Mixing: If using a two-part epoxy, dispense equal parts of resin and hardener onto a disposable card and blend them thoroughly for 60 seconds with a clean toothpick.
- Targeted Application: Using the tip of a clean toothpick, transfer a pinpoint droplet of adhesive to the center of the post pad. Avoid using excessive glue, which can spread up the shaft and prevent earring clutches from sliding on smoothly.
- Alignment and Clamping: Press the post firmly onto the prepared mark on the earring reverse. Push the post into a block of craft foam or poster putty to keep it vertical and stationary while setting.
- Curing: Allow the bond to rest undisturbed. While adhesives may feel set within an hour, full chemical polymerization requires 12 to 24 hours. Premature handling will compromise the bond. For more details on maintaining silver pieces, see our review of silver earring repair techniques.
Straightening Bent Posts and Replacing Detached Findings
If your post has bent rather than snapped, straightening it requires care to prevent fracturing the metal.
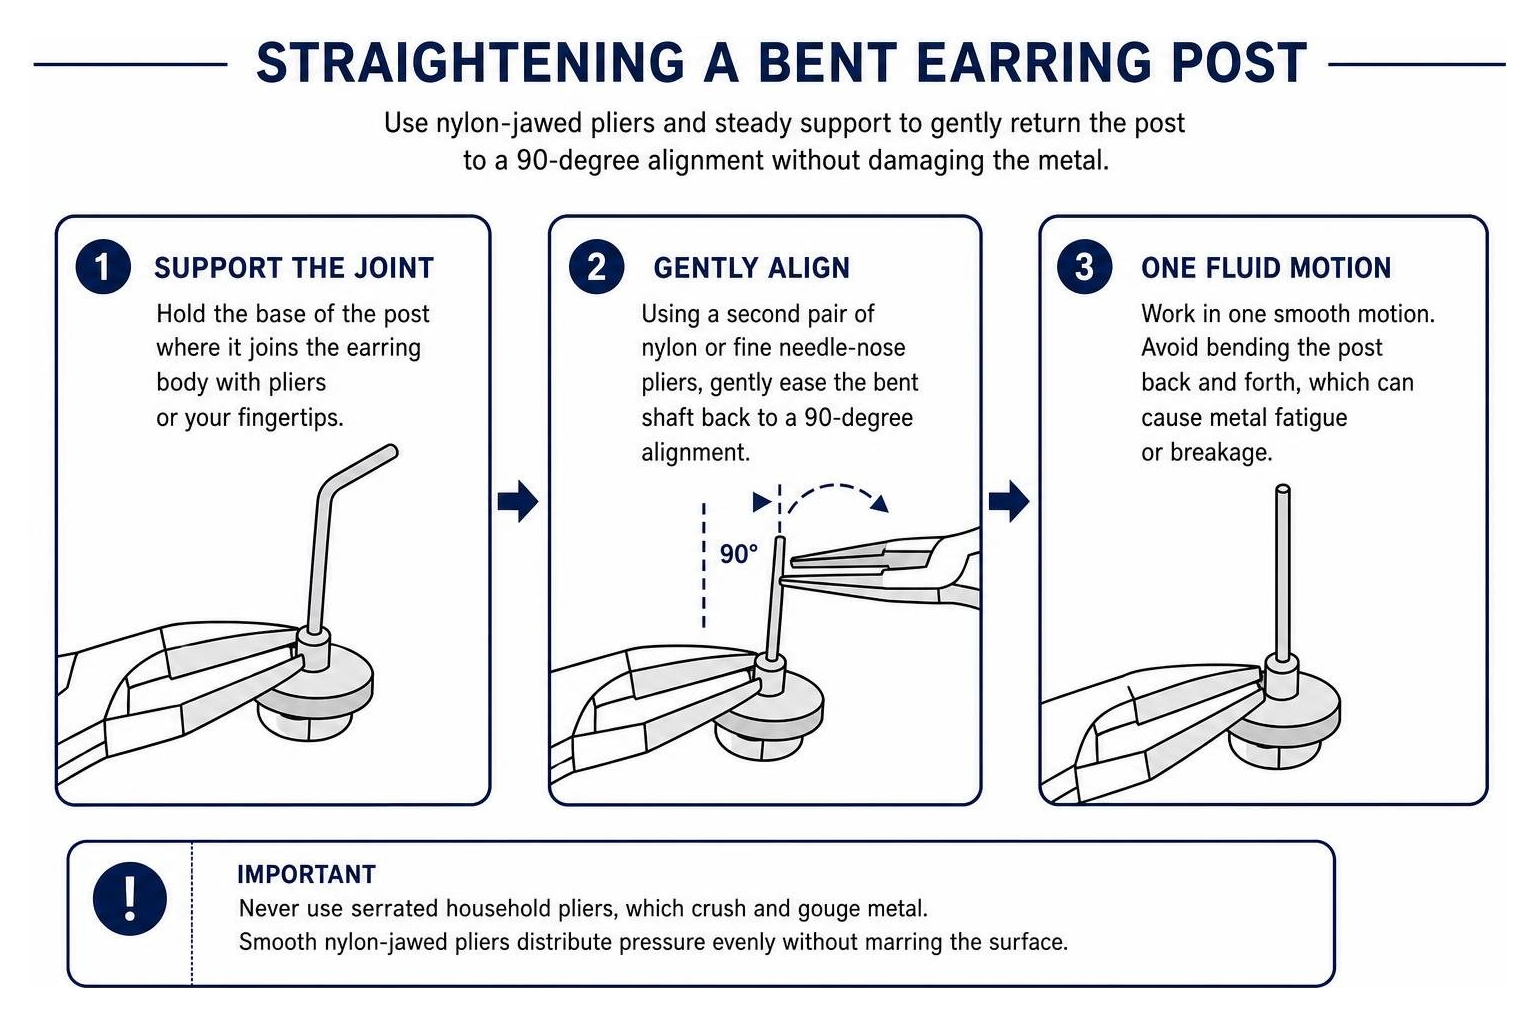
- Use Nylon-Jawed Pliers: Never use serrated household pliers, which crush and gouge precious metal wire. Smooth nylon-jawed pliers distribute pressure evenly without marring the surface.
- Support the Joint: Hold the base of the post where it joins the earring body with one pair of pliers or your fingertips. Use a second pair of fine needle-nose or nylon pliers to gently ease the bent shaft back into a 90-degree alignment.
- Work in One Fluid Motion: Avoid bending the post back and forth repeatedly, as this rapidly work-hardens the alloy and causes metal fatigue.
If the post is missing entirely, purchase a replacement finding featuring a flat pad base in a matching metal tone. For high-value designs like square emerald cut diamond stud earrings, skip home straightening if the post shows visible stress lines or micro-cracks at the joint—bring it to a professional bench jeweler instead.
Professional Earring Post Restoration and Soldering Techniques
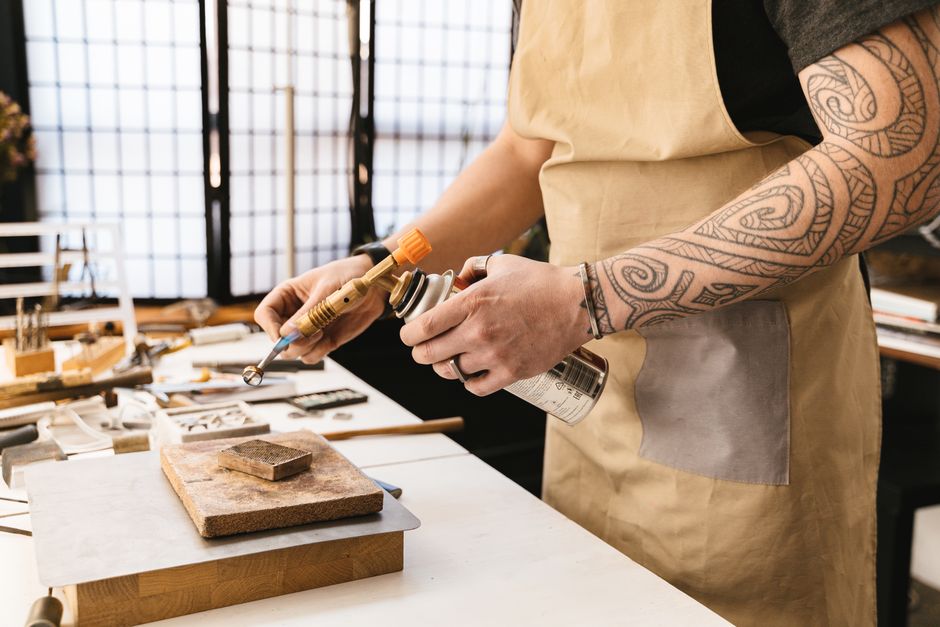
Fine jewelry crafted from solid gold, platinum, or palladium requires metallurgical fusion rather than adhesives. A bench jeweler permanently joins or replaces the post using specialized heating and welding equipment.
Torch Soldering vs Laser Welding for Fine Metals
Jewelers rely on two primary methods to permanently attach an earring post:
1. Traditional Torch Soldering
- Process: The jeweler cleans the earring, preps the contact point using a miniature ball bur to create a concave seat, and secures the post roughly one-third down its shaft using cross-locking tweezers. Flux is applied to prevent oxidation, and a small paillon of precious metal solder (matched in karat and color) is melted into the joint using a jeweler's micro-torch.
- Thermal Threshold: Silver and gold soldering requires temperatures exceeding 1,200°F (650°C). Standard electronic soldering irons used for wiring cannot achieve these temperatures and are entirely unsuitable for jewelry repair.
- Considerations: Heat travels rapidly through noble metals. If the earring features heat-sensitive stones (such as emeralds, opals, or pearls), they must be unset before torch work and reset afterward.
2. Modern Laser Welding
- Process: Laser welding uses a focused beam of light energy to melt and fuse the parent metals directly, often adding a microscopic strand of matching precious metal wire for reinforcement.
- Thermal Control: The heat is concentrated strictly at a pinpoint focal spot (fractions of a millimeter across) for milliseconds. The surrounding metal and neighboring diamonds remain cool to the touch.
- Ideal Use Cases: Laser welding is ideal for intricate pavé settings, antique filigree, and high-end studs like platinum certified round diamond stud earrings, where unsetting stones is risky or unnecessary.
Professional Repair Costs and Longevity Expectations
Professional jewelry repair restores an earring to factory structural integrity.
- Standard Bench Jeweler Rates: Simple soldering of an existing gold or silver post typically ranges from $25 to $50. Complete post replacement (including a new solid 14k gold post and matching friction back) averages $30 to $65 per pair.
- Luxury and Designer Bench Rates: High-end design houses with proprietary mechanisms or complex tension clips often charge between $180 and $205 to permanently set, lengthen, or rebuild earring posts.
- Longevity: A professionally soldered or laser-welded joint creates a permanent metallurgical bond. When properly work-hardened, a repaired post will last for years of continuous wear—even on articulated, moving pieces like diamond drop dangle earrings.
Prevention and Emergency Troubleshooting
A few proactive habits can help you avoid post damage altogether:
- Follow the "Last On, First Off" Rule: Put your earrings on after styling your hair, applying cosmetics, and putting on clothing. Remove them first before undressing to prevent catching on necklines or knits.
- Never Sleep in Studs: Remove all post earrings before going to bed. Compressing an earring between your head and the mattress creates continuous lateral torque.
- Use Individual Compartments: Store earrings in lined, compartmentalized jewelry boxes or individual soft fabric pouches. Allowing pieces to jumble together in a dish bends posts and scratches gemstones.
- Adjust Backing Tension Carefully: If a friction butterfly clutch feels overly tight, do not force it down the stem. Gently spread the rear scrolls with a round-nose plier or bring it to our showroom for a quick, safe adjustment.
- Emergency Temporary Fixes: If a post snaps while you are away from home, never use office tape or generic super glue while the earring is in your ear. Instead, switch to a clip-on earring converter or place the earring components in a secure pouch until you can arrange a proper repair for your round diamond stud earrings.
Frequently Asked Questions About Earring Post Repairs
What should I do if an earring post breaks while wearing it?
First, gently inspect your earlobe in a mirror. If a fragment of the post remains lodged in your ear, do not panic or poke at the piercing channel with unsterilized tools. Wash your hands thoroughly, sanitize a pair of fine tweezers with isopropyl alcohol, and grasp the exposed metal end to ease it straight out. If the skin is torn or the metal is embedded beneath the skin surface, seek prompt medical attention to avoid infection. Save all retrieved fragments in a sealed container for your jeweler.
Can standard super glue permanently fix a snapped earring post?
No. Standard household cyanoacrylate glue cures into a rigid, glass-like film that offers very poor resistance to shear forces and moisture from skin oils. The twisting and pulling force required to slide an earring clutch on and off will quickly snap a super-glued post. Additionally, super glue can leave unsightly white residue (blooming) on fine metal mountings. Use a two-part jewelry epoxy for costume repairs, or choose professional soldering for fine jewelry.
How do jewelers strengthen a post after soldering?
Soldering subjects metal to extreme heat, which anneals (softens) the alloy and leaves the post pliable. To restore rigidity, a bench jeweler work-hardens the post using controlled mechanical manipulation. They grip the tip of the post with flat-nose or parallel pliers and gently twist it back and forth—typically two turns clockwise and two turns counterclockwise—while pulling under light tension. This reorganizes the metal's internal crystalline structure, returning the post to its original spring-hard temper.
Conclusion
A broken earring post does not mean the end of a cherished piece of jewelry. By diagnosing the metal type and understanding the difference between temporary cold adhesives and permanent bench restoration, you can choose the right repair approach for your earrings. Simple costume pieces can often be restored at home with a careful epoxy application, while fine diamond studs, family heirlooms, and precious metals deserve the lasting strength of professional bench soldering or laser welding.
At Mervis Diamond Importers, our master bench jewelers provide expert, pressure-free repair and restoration services across our Tysons, VA, Rockville, MD, and Washington, DC showrooms. Whether you need a snapped post replaced, a loose clutch adjusted, or comprehensive fine diamond jewelry care advice, we are here to ensure your favorite jewelry remains secure, comfortable, and beautiful for generations to come.